

This is a tutorial on how to convert your standard garage remote into a smart remote accessible over the internet, so you could control your garage doors from anywhere.
Introduction
Our technology is evolving every day and various electronic devices are getting smarter and smarter. And, that “smartness” is usually pricey. But! One of the main principles of this blog is to make or improve things in an affordable and open-source way, so hold your back, we’re making a smart garage controller, for a few bucks!
We are going to use cheap but quality Chinese electronics to connect an existing remote controller to the Internet, using lightweight, reliable, and fast MQTT messages – to make a propper IOT device that is accessible from everywhere.
Prerequisites
To be able to start this adventure, we need to be sure that we have:
Our electronic is in range remote
Basic understanding of electronics: It’s nice to have some basic knowledge of how electronic circuits work and how to handle electronic components safely.
Wi-Fi-enabled microcontroller with relay: You’ll need a Wi-Fi-enabled microcontroller like our ESP8266 and an appropriate relay board. Be aware that we’ll have to program our microcontroller so we’ll need programmer board.
Garage remote control: Ensure you have the existing garage remote control that you want to modernize.
Wires and power supply: Prepare wires to connect the remote with the relay and power supply.
Soldering iron: To override manual buttons on the remote controller, we’ll solder the wires to the electronic board of the existing remote controller.
Computer: You’ll need a computer to program your microcontroller and to set up the MQTT broker.
- MQTT Broker: A server application that enables the reliable exchange of messages between your remote control and your smartphone or computer.
- MQTT Client: An application on your smartphone or computer, that allows you to send messages to your remote and to control it.
Needed Components and Materials
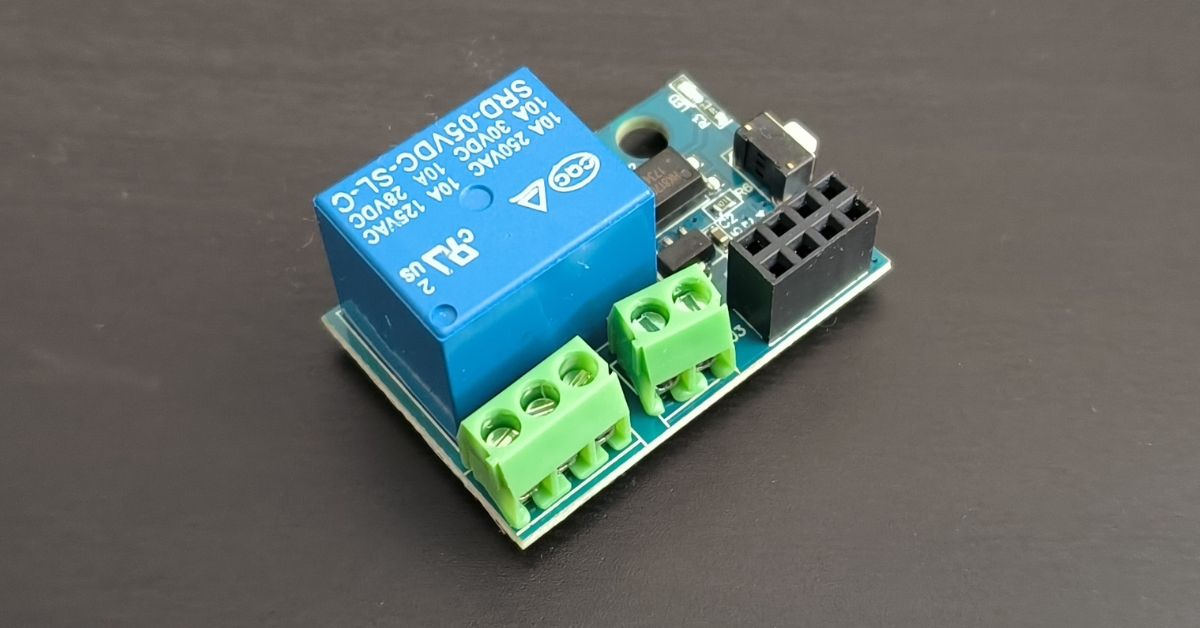
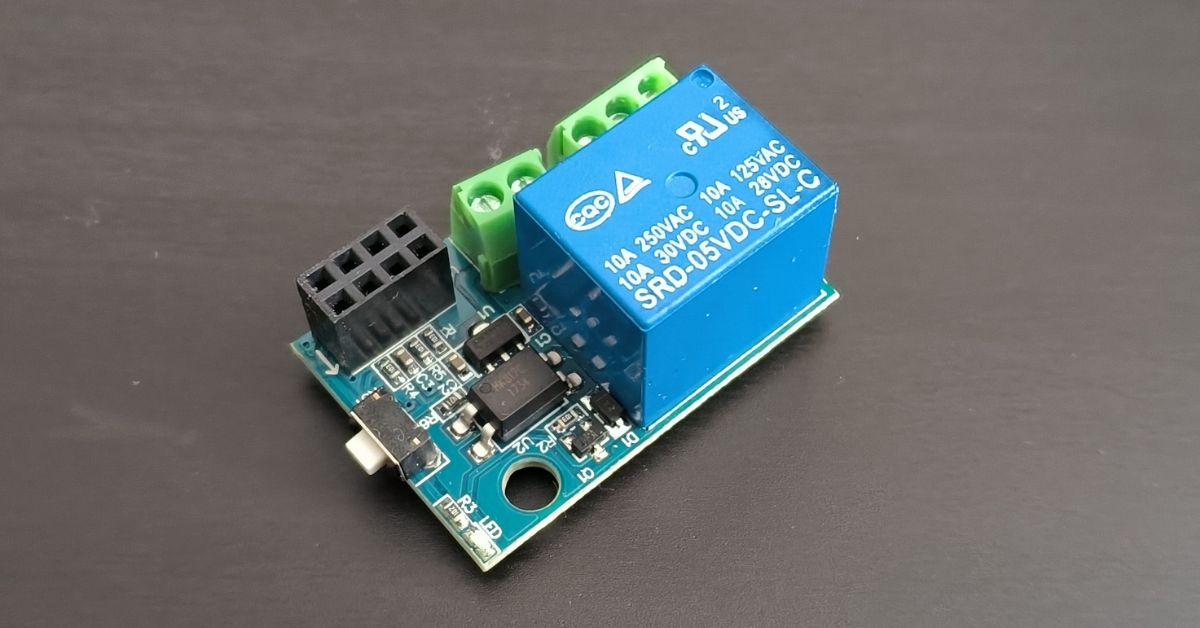
Step 1: Understanding the Relay Board
Before modernizing your garage remote, it’s essential to understand the relay board and its role in the process.
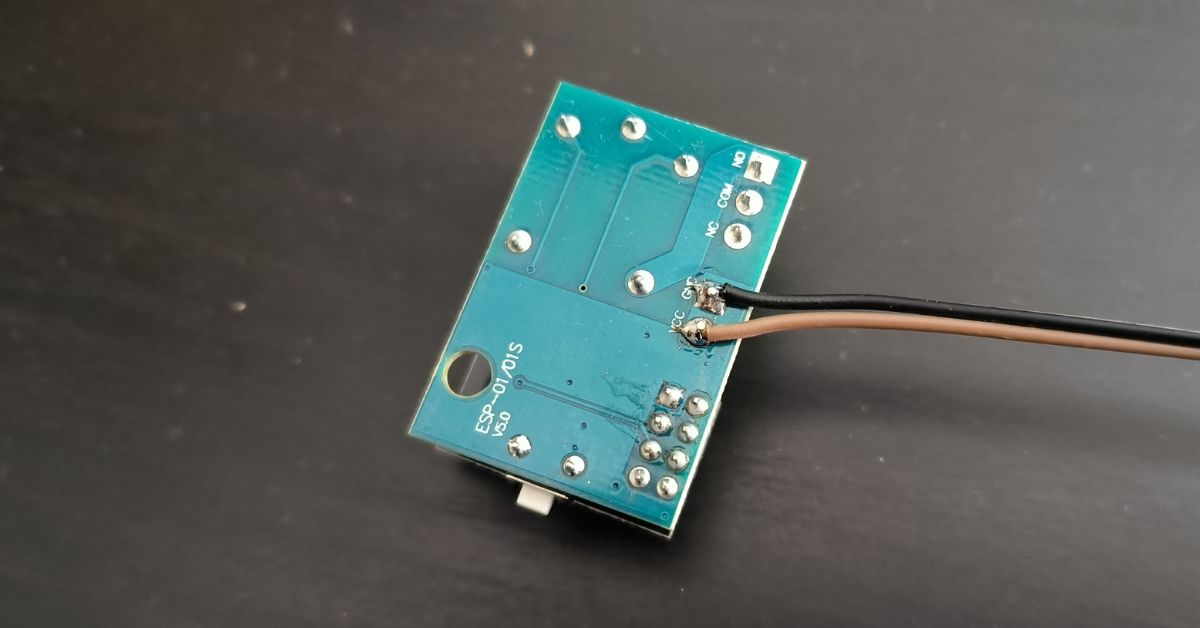
A relay is an electrical switch that a signal from a microcontroller can control. It acts as a bridge between the microcontroller and the garage remote, allowing you to simulate button presses on the existing remote. Our relay board has a port for a microcontroller and wireless module – ESP8266.
You can find the exact model in the Needed Components and Materials section above.
Step 2: Setting up the MQTT Broker
In order to give a command to a microcontroller which operates the relay and press the button on the old remote control, we need to communicate with that microcontroller somehow. Luckily, the microcontroller has integrated WiFi module, so it will connect to the internet and listen for a messages.
Great and a lightweight solution for messaging in our case is the MQTT protocol. To use MQTT messages, we need a MQTT Broker, which is a server component which enables message communication between MQTT clients. In our case one MQTT client will be our microcontroller, while the other one will be smartphone application.
MQTT Broker could be public or private. For this example, we’re going to use free one, to demonstrate and test our idea. If you decide to go further with this approach I strongly advice you to go with private one due to security and performance reasons. If there is an interest, I will make tutorial on how to set up affordable private broker.
Free MQTT Broker
We are going to use HiveMQ public MQTT Broker. In order to use this service you need server address and the port. In this case that is :
Broker: broker.hivemq.com
TCP Port: 1883
Be aware that this is a public broker and the others could see the messages you sending and receiving.
We are going to use just one topic to exchange our messages between microcontroller and a smartphone. For example garageX where you should change the X with some other characters, for example your date of birth (e.g. garage12121987).
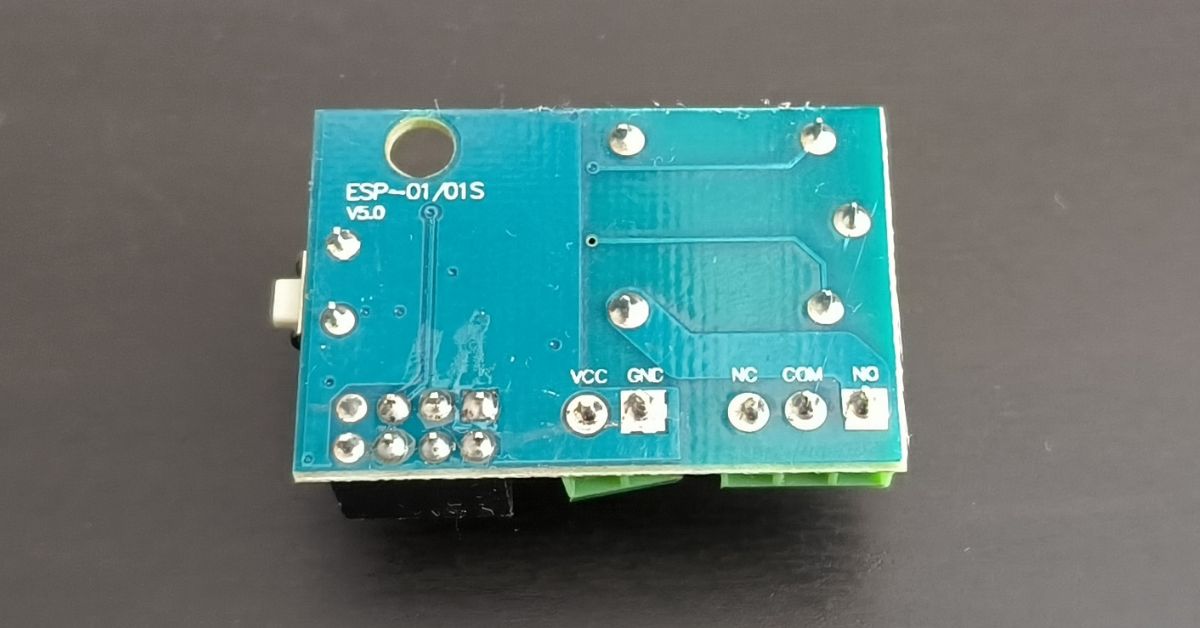
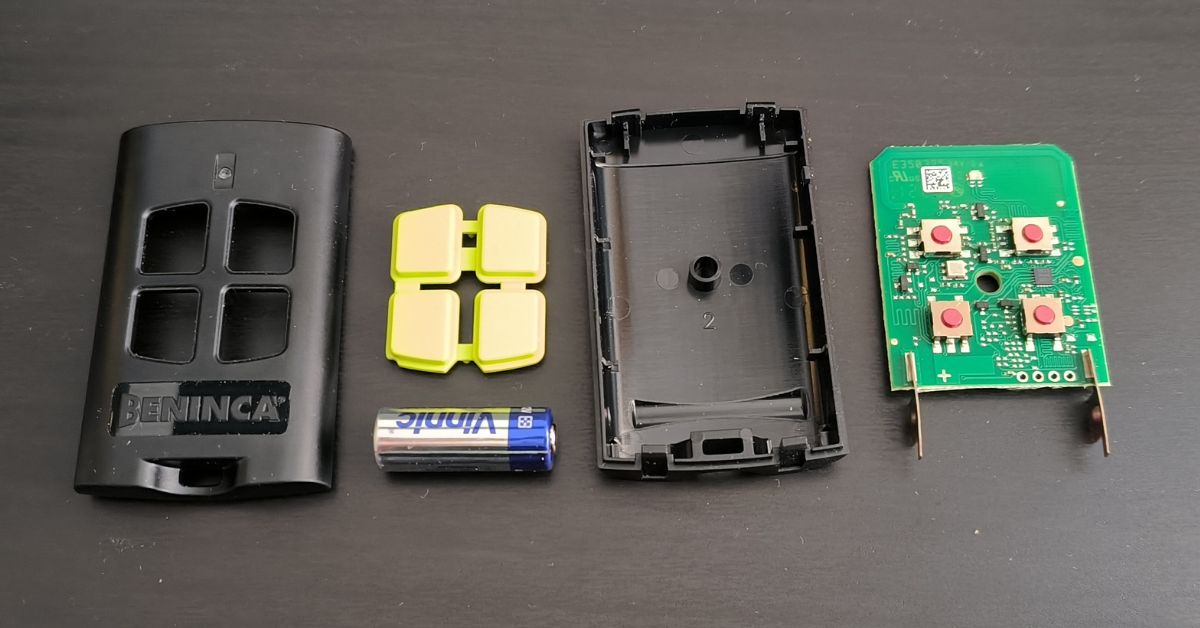
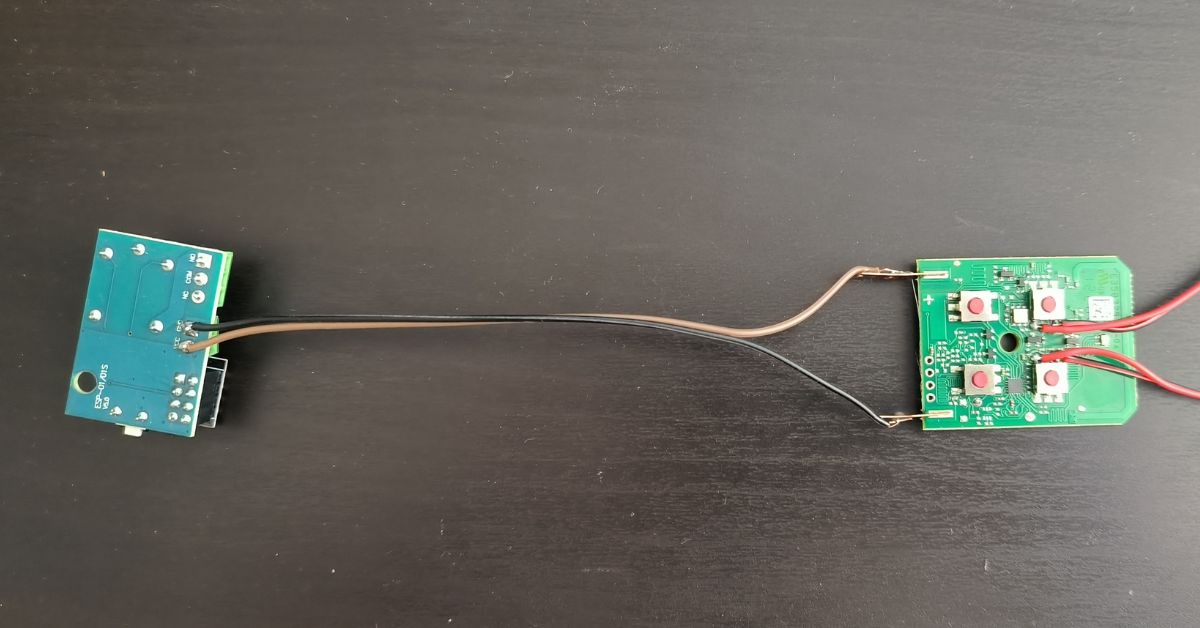
Step 3: Wiring the Relay Board and Remote
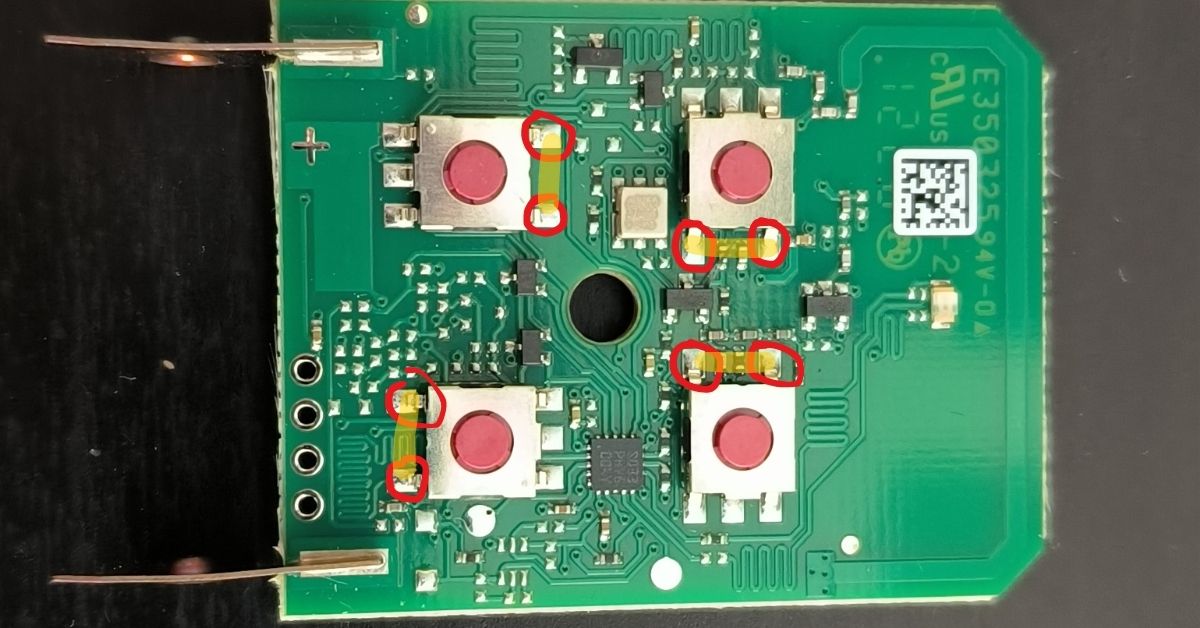
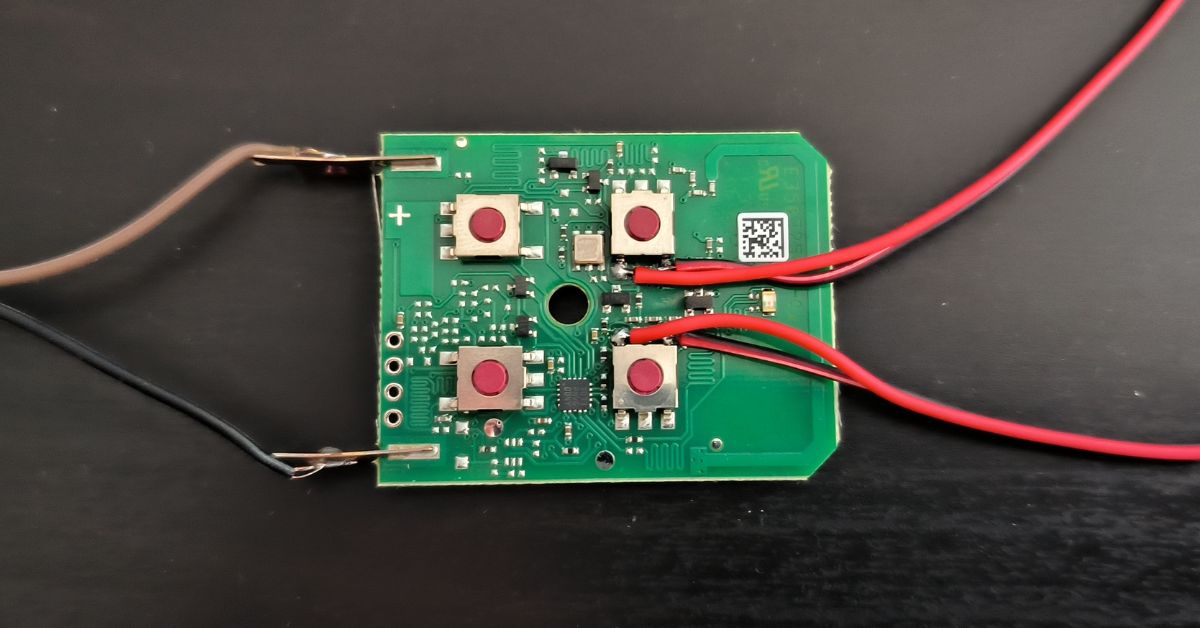
To controll our old remote, we need to overide the button. To do that we’ll solder two wires on the button pins, so when those wires are connected together, it is the same thing as when the button is pressed. The cool thing regarding the wires is that they can be connected to the relay, so relay will connected them when microcontroller gaves the command to the relay.
Button pins where you should solder your wires are marked red in the image bellow.
Also, when soldering the wires for the button override, solder two wires on the battery connectors as we are going to remove the battery and to use power supply instead, so you don’t need to take care about battery anymore. The battery is 12V DC, and our relay module could be powered with power supply with voltage from 5V to 12V DC, so we are going to use 12V power supply.
Step 4: Programming the Microcontroller (ESP8266)
To program our ESP8266 microcontroller, besides the microcontroller, we’ll need a programmer for it. The exact item could be found in the Needed Components and Materials section above.
If you need help with setup and code upload, take a look here.
					#include <PubSubClient.h>
#include <ESP8266WiFi.h>

#define WIFI_SSID "YOURNETWORKNAME"
#define WIFI_PASSWORD "NOVAYOURNETWORKPASSWORD"
#define RELAY 0 // relay connected to  GPIO0

char mqttServer[]  = "broker.hivemq.com"; //change it for your MQTT server IP or network name
int mqttPort  = 1883; //1883 is the default port for MQTT. Change if necessary
char deviceId[]  = "myRelay-001"; //every device should have a different name
char topic[]  = "garage1212"; //the topic should be different for each device as well
//char mqttUser[]  = "YOURMQTTUSERNAME"; // Used for private MQTT broker
//char mqttPassword[]  = "YOURMQTTPASSWORD"; // Used for private MQTT broker
WiFiClient wifiClient;
PubSubClient client(wifiClient);
int status = WL_IDLE_STATUS;

void setup() {
  Serial.begin(9600);
  pinMode(RELAY,OUTPUT);
  digitalWrite(RELAY, HIGH);
  delay(10);
  Serial.println("Let' start now");
}

void loop() {
  if ( !client.connected() ) {
    connect();
  }
  client.loop();
}

unsigned long lastOperation;
const long MIN_OPERATION_INTERVAL = 2000L;

void callback(char* topic, byte* payload, unsigned int length) {
    Serial.print("Message arrived in topic: ");
    Serial.println(topic);
    Serial.print("Message: ");
    signed long now = millis();
    long deltaTime = now - lastOperation;
    if (deltaTime > MIN_OPERATION_INTERVAL) {
      String message = "";
      for (int i = 0; i < length; i++) {
        message = message + (char)payload[i];
      }
      if(message == "1") {
        digitalWrite(RELAY,LOW); // If message "1" received, press the button
        delay(2000);
        digitalWrite(RELAY,HIGH); // After 2 seconds, release button
      }
      Serial.println();
  } else {
    Serial.println("Operation denied right now. Try again later.");
  }
}

void connect() {
  while (!client.connected()) {
    status = WiFi.status();
    if ( status != WL_CONNECTED) {
      WiFi.begin(WIFI_SSID, WIFI_PASSWORD);
      while (WiFi.status() != WL_CONNECTED) {
        delay(500);
        Serial.print(".");
      }
      Serial.print("Connected to ");
      Serial.println(WIFI_SSID);
    }
    client.setServer(mqttServer, mqttPort);
    client.setCallback(callback);
    if (client.connect(deviceId, mqttUser, mqttPassword)) {
      client.subscribe(topic);
      Serial.println("Connected to MQTT Server");
    } else {
      Serial.print("[FAILED] [ rc = ");
      Serial.print(client.state() );
      Serial.println(" : retrying in 5 seconds]");
      delay(5000);
    }
  }
}
Step 5: Building the User Interface
In order to control our remote, we have to send an MQTT messages. One of the easiest ways it to use Android application called MQTT Dash.
We need to make a new connection to our MQTT broker -> enter the address, port and authentication information if needed. Then, add new button which is sending “1” as a payload to the topic you set in the code above (e.g. garage1212).
Step 6: Testing and Troubleshooting
Now that you’ve completed the setup and built the user interface, it’s time to test your modernized garage remote system and address any potential issues. Testing and troubleshooting will ensure that everything is functioning as expected.
- Check soldered wires: When you connect the soldered wires, check if the remote works on the same way as when the button is pressed.
- Verify Wi-Fi Connection: Ensure that your microcontroller is connected to your wifi network. Take a look at the serial debug window in the Arduino IDE to check if connected to the network or use network scanner tool to check connected devices.
- Verify MQTT Communication: Ensure that your microcontroller is successfully connecting to the MQTT broker. Check if it is able to subscribe to the relevant topics and receive messages. Publish test messages from your user interface and confirm that the microcontroller receives them correctly.
- Test Relay Functionality: Send commands from your user interface to activate the relay board and control the garage remote. Monitor the behavior of the relay board and observe if it successfully triggers the garage door opener. Confirm that the relay board is correctly wired and functioning as intended.
- Check User Interface Responsiveness: Test the responsiveness of your user interface. Is “1” sent to the topic when pressed in the app?
- Evaluate Garage Door Operation: Open and close your garage door using the modernized remote system to confirm that the commands are being executed accurately. Pay attention to any unexpected behavior or delays during the operation.
- Iterate and Improve: Based on your testing and troubleshooting, make any necessary adjustments or refinements to enhance the system’s performance. This could include fine-tuning the code, optimising the user interface, or addressing any hardware issues that may have surfaced during testing.
By thoroughly testing and troubleshooting your modernised garage remote system, you can ensure its reliability and smooth operation. Don’t hesitate to iterate and make improvements as needed to achieve the desired functionality and user experience.
Congratulations! You’ve now successfully modernised your garage remote using IoT and can conveniently control it from anywhere using your computer or smartphone. In the next section, we’ll conclude the tutorial and summarise the key takeaways.
Conclusion
Congratulations on successfully modernizing your garage remote with IoT! You have transformed a traditional remote control into a smart and connected device that can be controlled from anywhere using your smartphone or computer. By integrating an MQTT broker, a relay board, and a user-friendly interface, you now have the power to conveniently open and close your garage door remotely.
Through this tutorial, you’ve learned the fundamentals of IoT and how it can be applied to upgrade everyday objects like garage remotes. You’ve explored the key components involved, from the microcontroller and relay board to the MQTT broker and user interface. Each step has brought you closer to creating a seamless and efficient system for remote garage control.
Modernizing your garage remote not only enhances convenience but also improves security by allowing you to monitor and control access to your garage remotely. Whether you’re at work, on vacation, or simply inside your home, the ability to manage your garage door from your fingertips provides peace of mind and adds an extra layer of safety.
Remember, this tutorial is just the beginning of your IoT journey. There are countless possibilities for expanding and customizing your smart garage system. You can integrate additional features like voice control, sensor-based automation, or even connect it to other smart devices in your home. Let your creativity and curiosity guide you as you continue to explore the endless potential of IoT.
We hope this tutorial has inspired you to embrace the power of IoT and explore further possibilities in making your life smarter and more connected. Enjoy the convenience, security, and futuristic experience of controlling your garage remote with ease.
Additional Tips
Additional Tips for Enhancing Your IoT Garage Remote System:
Security Measures: Consider implementing additional security measures to protect your IoT garage remote system. This can include using secure MQTT communication protocols, implementing authentication mechanisms, and regularly updating the firmware and software components to patch any security vulnerabilities.
Remote Access: If you want to access your garage remote system from outside your home network, ensure you have proper port forwarding and firewall configurations in place. Additionally, consider using a Virtual Private Network (VPN) for secure remote access.
Backup and Redundancy: It’s always a good practice to have backups of your configurations, code, and settings. In case of any unforeseen issues or device failures, having backups will save you time and effort in restoring your system.
Integration with Smart Home Platforms: Explore possibilities for integrating your IoT garage remote system with popular smart home platforms like Home Assistant, Google Home or Amazon Alexa. This will allow you to control your garage door through voice commands and incorporate it into your overall smart home ecosystem.
Regular Maintenance: Perform regular maintenance checks on your IoT garage remote system to ensure its proper functioning. Check for loose connections, update software and firmware as needed, and replace any worn-out components promptly.
User Experience Enhancement: Continuously seek feedback from users and explore ways to improve the user interface and overall experience. Incorporate user-friendly features, intuitive controls, and responsiveness to make interacting with the garage remote system a seamless and enjoyable experience.
Remember, as technology evolves, new opportunities and advancements in IoT will continue to emerge. Stay curious, keep exploring, and never stop innovating to make the most of your IoT-enabled garage remote system.
